Powered by Jasper Roberts Consulting - Widget
Top photoshop tips & tutorials: 2014
Powered by Blogger.
RSS

Using Field Blur in Photoshop


Planet Photoshop


Using Field Blur in Photoshop


It basically enables you to add depth of field to flat images, and build a gradient of blurs using multiple blur points with different amounts of blur.


This tutorial will show you how to use the Field Blur filter to make photos look more interesting by creating out-of-focus areas, along with masks and selections, plus a cool and easy way to create awesome bokeh effects.


Tutorial Assets

1.Clean by threephin

2.Red Rose by Jim Bahn

3.Christmas Lights — Nov 30 by Lindsey Turner


Working with Pins

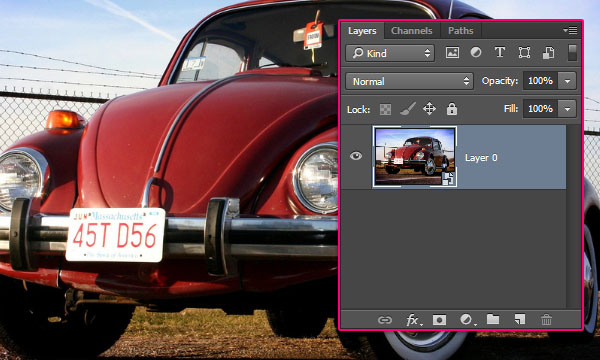
STEP ONE: Open the clean image, Right-click the Background layer, and choose Convert to Smart Object. Alternatively, you can select that layer and go to Filter>Convert for Smart Filters. This is an optional step, but smart objects are great when using filters, as they make the applied filters editable at any time, as well as create smart filter masks that can help with modifying and cleaning up the final results.


Using Field Blur in Photoshop


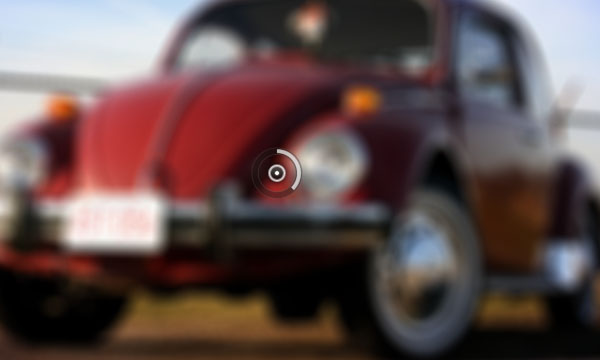
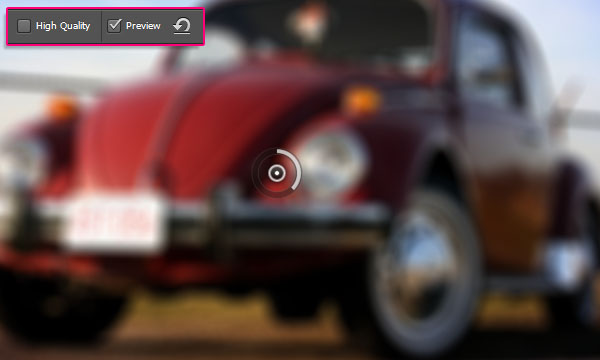
STEP TWO: Go to Filter>Blur Gallery>Field Blur to open the Blur Gallery. Initially, the blur effect is applied uniformly to the whole image, creating a Gaussian Blur-like effect. You’ll also notice a circular pin icon in the center of the image. This controls the blur amount and position, as you’ll see in a minute.


Using Field Blur in Photoshop


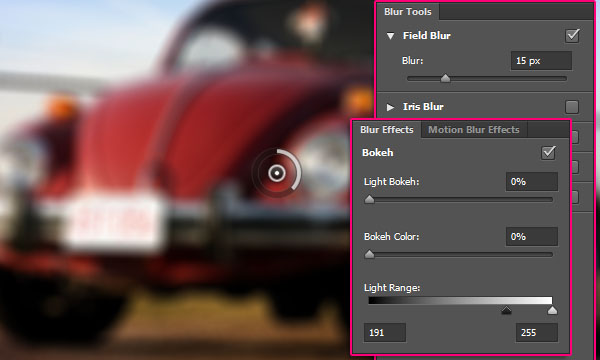
STEP THREE: At the right side of the screen, there are two panels: The main Blur Tools panel at the top with the Field Blur controls and options, and the Blur Effects panel at the bottom with some extra options for the bokeh effect.


Using Field Blur in Photoshop


STEP FOUR: There are a couple more controls in the Options Bar that might come in handy, as well. High Quality controls the rendering quality of the preview. If this box is checked, the preview might be rendered a bit slower, depending on your device. When checked, Preview shows the result of any changes in the blur filter’s settings. When unchecked, you can view the original image without any blur. Tip: You can press the P key to turn the Preview on and off. Click the Remove All Pins icon (curved arrow) to remove all the blur pins on the image.


Using Field Blur in Photoshop


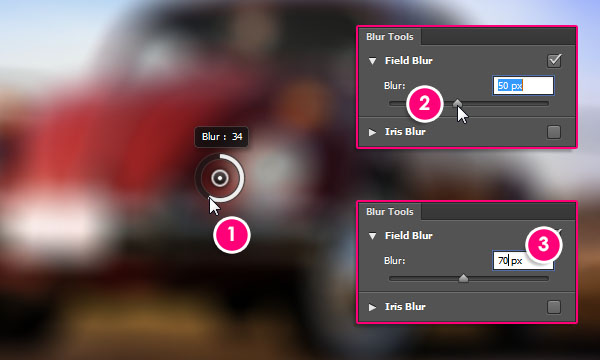
STEP FIVE: To move the pin around, simply click on its center and drag it to a new position. To change the blur amount of a pin, select that pin by clicking its center, then you can either:


• Move the mouse over the outer ring, then click-and-drag clockwise to increase the blur amount and counterclockwise to decrease it.

• Drag the Blur slider in the Blur Tools panel to the right to increase the blur amount and to the left to decrease it.

• Click inside the Blur field in the Blur Tools panel and enter an integer value between 0 and 500 px.


Using Field Blur in Photoshop


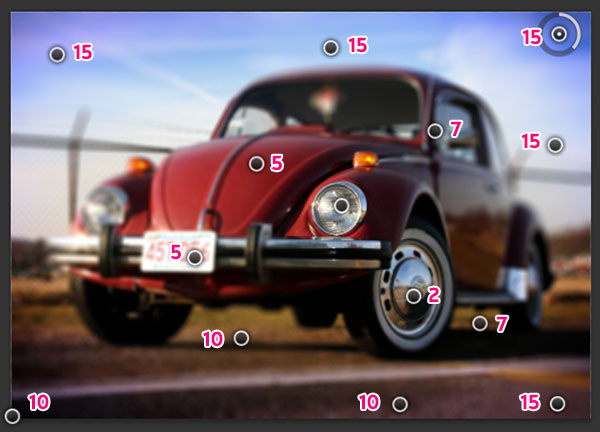
STEP SIX: To start building up the field blur effect, drag the pin you have and place it on top of the area that you want to stay in focus, then change the Blur amount to 0. This means that no blur effect will be applied for this pin at all. Move your mouse over to where you want to start creating the blur effect and click once to add a new pin. You can add as many pins as you need.


Using Field Blur in Photoshop


For each pin, place it where you want and change its Blur amount to create a gradual blurring effect that increases as you move farther away from the area in focus. Below are the pins used with the Blur amounts for each one of them. You can definitely change this as you like, depending on what final result you want to get. It’s all a matter of adding multiple pins with different positions and Blur values.


Using Field Blur in Photoshop


If you want to remove an individual pin, select it and press the Delete (PC: Backspace) key.

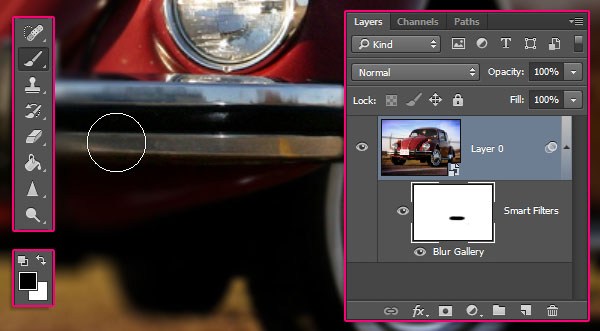
When you like the result, click the OK button in the Options Bar and wait a bit for the filter to be fully rendered.


Using Field Blur in Photoshop


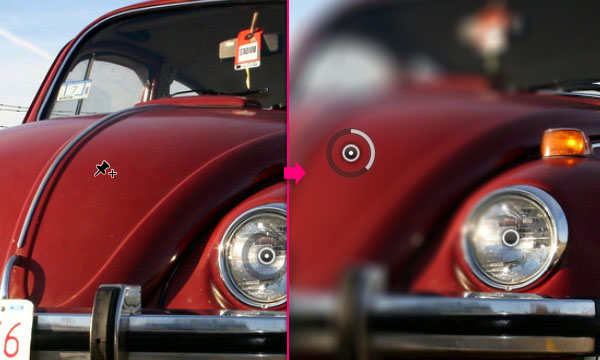
STEP SEVEN: Sometimes the pins alone are not enough to control the effect, especially for more complex or detailed images. That’s where the filter mask comes in handy. Expand the smart object layer by clicking the disclosure triangle on the right, then select the Smart Filters thumbnail. Choose the Brush tool (B) and pick a soft, round brush. Press D then X to set the Foreground color to black, and start painting any areas where you want to remove the blur effect. This masks out those areas, giving you much more control over the final result. Note that you can also double-click the filter’s name below the Smart Filters thumbnail to open that filter and modify its values if needed.


Using Field Blur in Photoshop


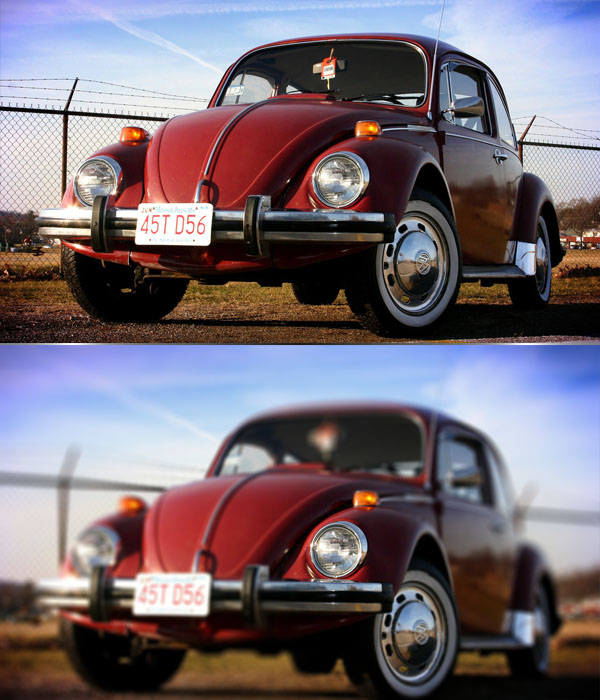
Here’s the before and after image. The filter adds a nice depth to the image pretty easily and quickly.


Using Field Blur in Photoshop


Working with Selections

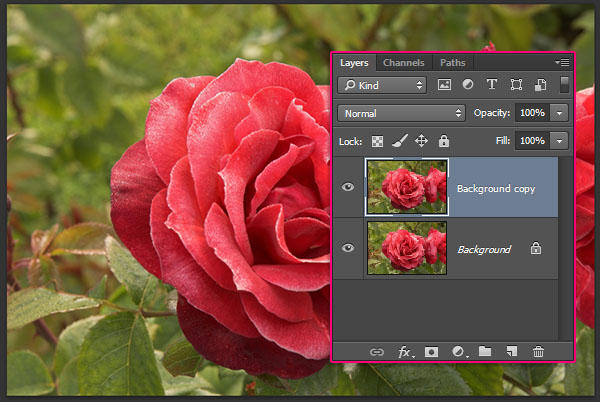
STEP ONE: If you don’t want to use smart objects, or want more precise final results, you can use selections. Open the Red Rose image and drag the Background layer onto the Create a New Layer icon at the bottom of the Layers panel to duplicate it. Creating copies is always a good idea if you’re not using smart objects. That way you still have the original image and you can blend the copy with the original if needed at any time.


Using Field Blur in Photoshop


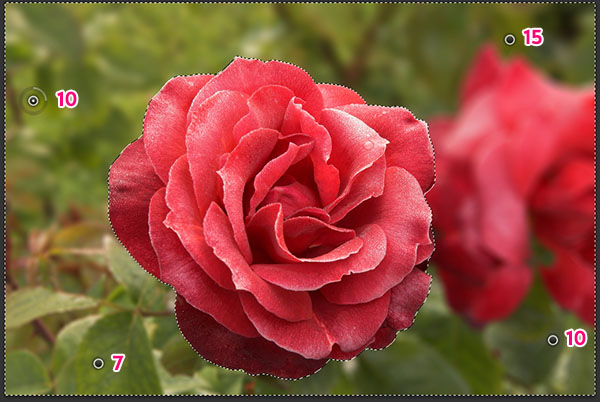
STEP TWO: Use any of the selection tools to create a selection around the area you want to keep in focus. We used the Magnetic Lasso tool (nested under the Lasso tool [L]) to select the rose in the center of the image. You don’t always need precise selections. Sometimes, a simple feathered ellipse is enough. It depends on the image you’re using and the area you’re working on.


Using Field Blur in Photoshop


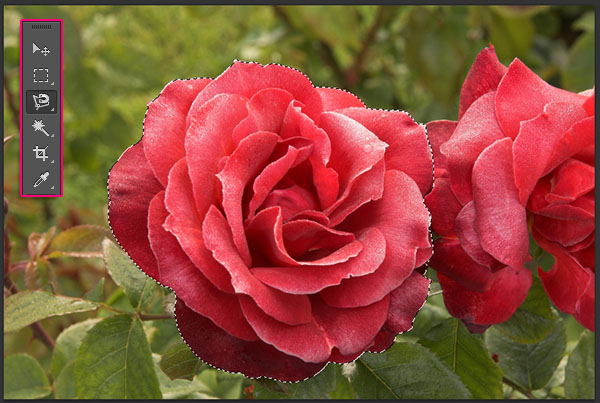
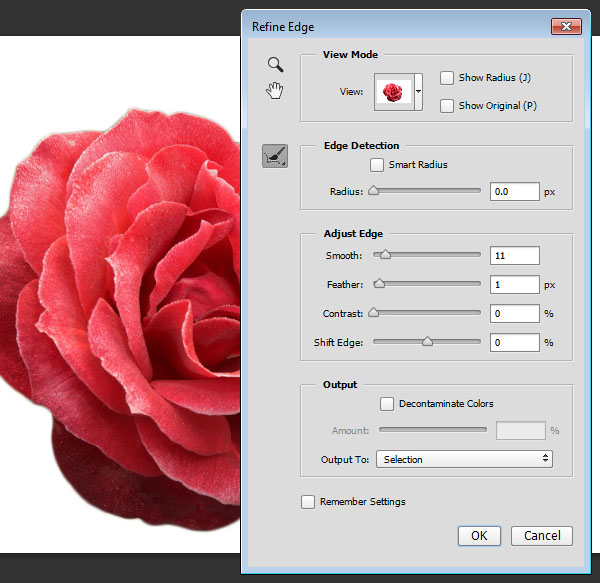
Adjust the selection by going to Select>Refine Edge. We changed the Smooth value to 11 and the Feather to 1 px. Make sure that the selection is smooth and clean and click OK.


Using Field Blur in Photoshop


STEP THREE: Go to Select>Inverse. Now the area surrounding the rose will be selected instead of the rose itself. Go to Filter>Blur Gallery>Field Blur. Notice that the blur effect is applied to the selected area only, so the rose will not be affected at all.


Using Field Blur in Photoshop


Now you can start building up the blur gradient just like you did before by adding pins with different positions and Blur amounts. Click OK to apply the filter. Press Command-D (PC: Ctrl-D) to deselect.


Using Field Blur in Photoshop


After applying the filter, use the Eraser tool (E) to blend the blurred image with the original if there are any harsh edges or unwanted areas.


Using Field Blur in Photoshop


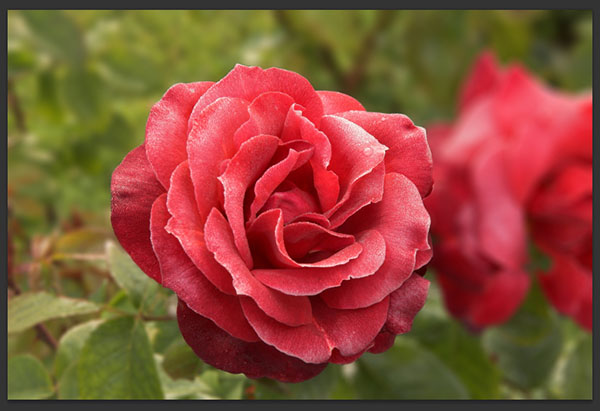
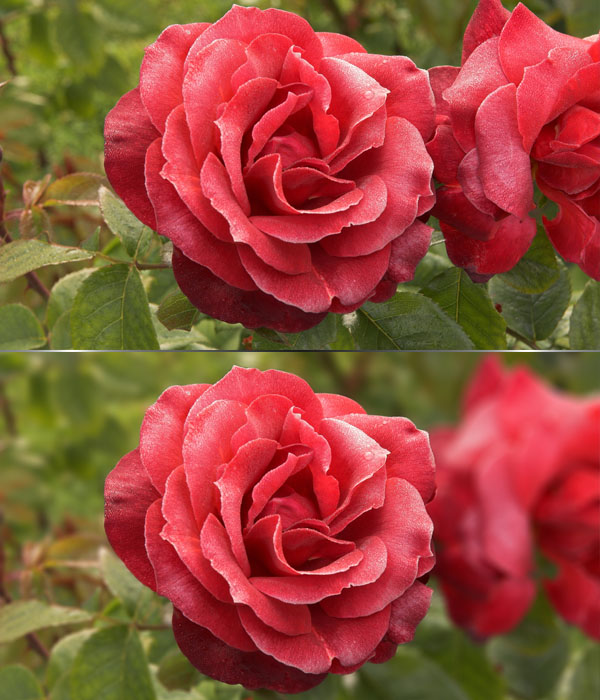
Here’s the before and after. Keep in mind that the filter cannot be modified after applying it because we didn’t use a smart object.


Using Field Blur in Photoshop


Creating a Bokeh Effect

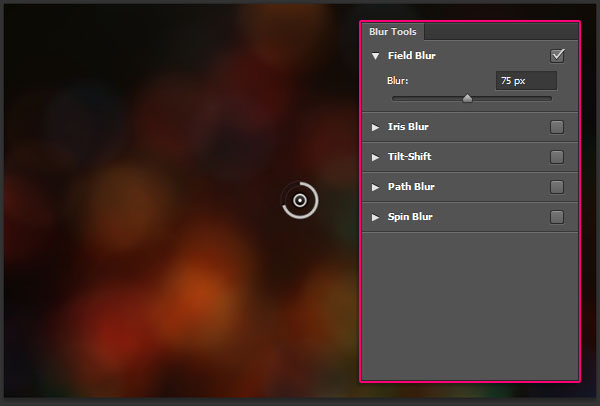
STEP ONE: Another cool effect you can achieve with the Field Blur is a bokeh effect. Bokeh is simply the effect created when the camera lens renders out-of-focus points of light. If you have any image with a couple of lights, preferably against a dark background, or an image with some contrast going on between its elements, you can achieve that effect using the Field Blur filter. Open the christmas lights — nov 30 image, and go to Filter>Blur Gallery>Field Blur. Increase the Blur value to around 75.


Using Field Blur in Photoshop


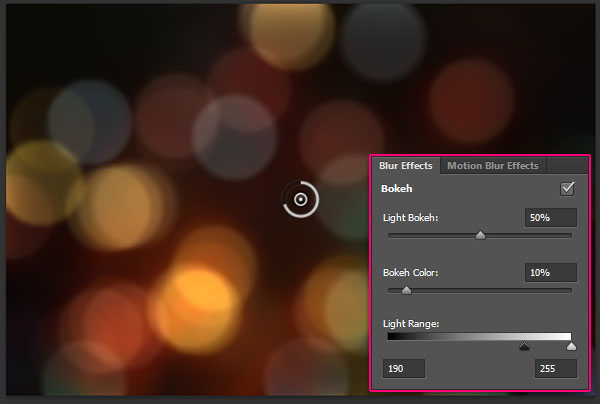
STEP TWO: Check the Bokeh box in the Blur Effects panel, and start changing the values of the settings below it. The Light Bokeh value controls the bokeh effect’s overall intensity. Light Range controls the range of light where the bokeh appears. If you drag the black slider to the left, you’ll exclude the darker areas, and if you drag the white slider to the right, you’ll exclude the lighter areas of the image. Bokeh Color controls how colorful the bokeh is, similar to the Saturation in the Hue/Saturation dialog.


Using Field Blur in Photoshop


STEP THREE: You can go back to the Blur value and decrease it or increase it to get smaller or bigger bokeh renders.


Using Field Blur in Photoshop


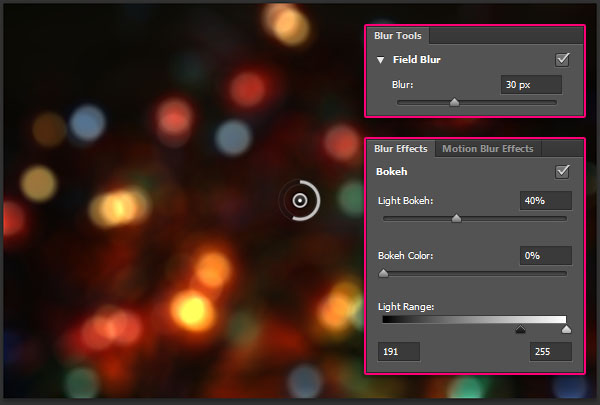
The bokeh can be created as a texture using the whole image or, depending on the image you have, you can use masks or selections to apply the bokeh effect to certain areas of the image, as well.


Using Field Blur in Photoshop


This tutorial covered the basics of the Field Blur filter and explained a couple of different ways of using it for various images. I hope you enjoyed the tips and tricks and found the tutorial helpful.


  • Digg
  • Del.icio.us
  • StumbleUpon
  • Reddit
  • RSS

Fresh Glossy Text Effect


Planet Photoshop


Fresh Glossy Text Effect


This tutorial will show you a simple way to create a cool, fresh, glossy text effect using layer styles and a couple of images.


Tutorial Assets

1. Franks Font

2. Water Splash 3 by Moonglowlilly

3. Water Drops by Gex78

4. Gradient-Shapes for Photoshop by ilnanny (Load the CHROMES.grd file)


STEP ONE: Create a new 850×550 px document at 72 ppi. Click the Foreground color swatch and set the Foreground color to #22272d, then set the Background color to #101115. Choose the Gradient tool (G), click the gradient thumbnail in the Options Bar to open the Gradient Editor, click the Foreground to Background gradient, and click OK. Now click the Radial Gradient icon in the Options Bar. Click-and-drag from the center of the document to one of the corners to create the background gradient.


Fresh Glossy Text Effect


Select the Type tool (T) and, using the Franks font at 230 pt, type the word “FRESH” in white in the center of the document. Change the text layer’s Fill value to 0%, then press Command-J (PC: Ctrl-J) twice to make two copies.


Fresh Glossy Text Effect

Fresh Glossy Text Effect


STEP TWO: Double-click to the right of the original text layer’s name to bring up the Layer Style dialog. Click Bevel & Emboss in the Styles list on the left. Set the Size to 27 px, uncheck Use Global Light, set the Angle to 149° and Altitude to 58°. Click the down-facing arrow next to the Gloss Contour thumbnail and choose Cone – Inverted. Check the Anti-aliased box, change the Highlight Mode to Overlay, make the Highlight Mode Opacity 100%, and change the Shadow Mode Opacity to 0%.


Fresh Glossy Text Effect


Now click Contour in the Styles list and check the Anti-aliased box.


Fresh Glossy Text Effect


Click Stroke in the Styles list. Set the Size to 1 px. Change the Fill Type to Gradient and set the Angle to 90°. Now click the Gradient thumbnail to open the Gradient Editor. Click the Load button on the right, navigate to the gradient-shapes for Photoshop download, locate the CHROMES.grd file, and click Open. The gradients will be added to the bottom of the list. Select the stainless steel 10x gradient and click OK to close the Gradient Editor.


Fresh Glossy Text Effect


Choose Inner Glow on the left. Change the Blend Mode to Soft Light and set Noise to 100%. Now click the yellow color swatch, use #c7bf5a as the color, and click OK to close the Color Picker. Set Source to Center and change the Size to 20 px.


Fresh Glossy Text Effect


Choose Gradient Overlay from the Styles list, then click the Gradient thumbnail to open the Gradient Editor. Click the black color stop at the bottom left of the gradient ramp, then click the Color swatch, set the color to #016f6e, and click OK to close the Color Picker. Now click the color stop at the bottom right, change the color to #fee847, click OK to close the Color Picker, and click OK again to close the Gradient Editor.


Fresh Glossy Text Effect


Now click Drop Shadow. Set the Opacity to 19%, uncheck Use Global Light, change the Angle to –143°, and make the Distance 18 px. Click OK to close the Layer Style dialog. This will style the main text layer. You can try different gradient fills if you like.


Fresh Glossy Text Effect

Fresh Glossy Text Effect


STEP THREE: Double-click to the right of the first copy text layer’s name to open the Layer Style dialog. Choose Bevel & Emboss on the left, change the Size to 10 px, uncheck Use Global Light, and make the Angle 63° and Altitude 69°. Check the Anti-aliased box, change the Highlight Mode to Overlay, Highlight Mode Opacity to 100%, and Shadow Mode Opacity to 0%. Click OK to apply the layer style. This will add another glossy layer to the text.


Fresh Glossy Text Effect

Fresh Glossy Text Effect


STEP FOUR: Double-click the second copy text layer to bring up the Layer Style dialog. Click Bevel & Emboss, set Size to 21 px, uncheck Use Global Light, and change Angle to –121° and Altitude to 58°. Now check the Anti-aliased box, change the Highlight Mode to Overlay, set the Highlight Mode Opacity to 100%, and change the Shadow Mode Opacity to 0%.


Fresh Glossy Text Effect


Click Contour in the Styles list. Click the down-facing arrow next to the Contour thumbnail, choose Half Round, and check the Anti-aliased box.


Fresh Glossy Text Effect


Choose Outer Glow from the Styles list. Change the Blend Mode to Linear Light and set Noise to 19%. Click the yellow color swatch, choose #dbffb7 for the color, click OK to close the Color Picker, and change Size to 7 px. Click OK to apply the layer style. This adds the last glossy layer, as well as an outer glow to make the effect look more interesting.


Fresh Glossy Text Effect

Fresh Glossy Text Effect


STEP FIVE: Open the Water Splash 3 image, choose the Move tool (V), and click-and-drag the image onto the working document at the top of the layer stack. Then go to Edit>Free Transform to resize it and move it around as needed so it covers the text you have. Press Enter to commit the transformation.


Fresh Glossy Text Effect


Double-click the water splash layer name, rename it “Drops,” then change its Fill value to 0%. Now double-click to the right of the layer name to bring up the Layer Style dialog. Choose Bevel & Emboss from the Styles list, check the Anti-aliased box, change the Highlight Mode to Vivid Light, and reduce the Shadow Mode Opacity to 10%.


Fresh Glossy Text Effect


Now choose Contour, change the Contour to Cone – Inverted, and check the Anti-aliased box.


Fresh Glossy Text Effect


Click Drop Shadow, reduce Opacity to 15%, uncheck Use Global Light, change the Angle to 113°, and set the Distance to 7 px. Click OK to apply the layer style. This styles the drops and blends them nicely with the text.


Fresh Glossy Text Effect

Fresh Glossy Text Effect


Command-click (PC: Ctrl-click) a text layer’s thumbnail to load it as a selection, then click the Add Layer Mask icon (circle in a square) at the bottom of the Layers panel. This will get rid of all the extra drops outside the text, but you’ll still be able to delete the mask and reapply it to any other text you create.


Fresh Glossy Text Effect

Fresh Glossy Text Effect

Fresh Glossy Text Effect


STEP SIX: Open one of the water drops images in the Gex78 folder (any image will work). With the Move tool, drag-and-drop the image into the working file, then drag it below the original text layer. Double-click the layer’s name and rename it Water BG. At the top of the Layers panel, change the blend mode to Overlay. Choose Edit>Free Transform and resize the image so it extends a bit behind the text.


Fresh Glossy Text Effect


Click the Add Layer Mask icon at the bottom of the Layers panel, and press D then X set the Foreground and Background colors to black and white, respectively. Pick the Gradient tool, click the gradient thumbnail in the Options Bar, choose the Foreground to Background gradient, click OK to close the Gradient Editor, then click the Linear Gradient icon in the Options Bar.


Fresh Glossy Text Effect


Next, place the cursor a bit above the water drops image’s top edge, then click-and-drag to the bottom of the text. This will erase the upper part of the image and make it fade into the original background. You can undo and redo the step until you get a result that you think looks good.


Fresh Glossy Text Effect

Fresh Glossy Text Effect


STEP SEVEN: Select the top layer, then Shift-click to select all the layers except the Background and Water BG layers. Choose Layer>Duplicate Layers, click OK in the dialog that appears, then choose Layer>Merge Layers. Double-click the duplicated layer’s name and rename it Reflection.


Fresh Glossy Text Effect


Go to Edit>Transform>Flip Vertical to flip the merged layer upside down. Using the Move tool, press-and-hold the Shift key and click-and-drag the reflection downward until it touches the text’s bottom edge. Choose Filter>Filter Gallery>Distort>Ocean Ripple, and change both values to 9. This makes the reflection look more realistic. (Note: If the Filter Gallery is grayed out, choose Image>Mode>8 Bits/Channel and try again.)


Fresh Glossy Text Effect

Fresh Glossy Text Effect

Fresh Glossy Text Effect


Change the Reflection layer’s blend mode to Hard Light, and lower the Opacity to 65%. Then, follow the same directions in paragraphs two and three of Step Six to erase the lower part of the reflection and make it fade out using a layer mask and a gradient. Make sure you drag the gradient from the bottom to well above the nonreflected letters to get the right fade.


Fresh Glossy Text Effect


STEP EIGHT: Click the Create a New Layer icon at the bottom of the Layers panel to add a layer above the reflection layer. Rename the layer Shadow, click the Foreground color swatch, choose #464646 for the color, and click OK to close the Color Picker. Choose the Brush tool (B) and open the Brush panel (Window>Brush). With Brush Tip Shape selected on the left, set the Size to 80 px, Roundness to 50%, and Spacing to 50%. Now click Shape Dynamics, change Size Jitter to 30%, and make sure Control is set to Off for all instances.


Fresh Glossy Text Effect


Change the Shadow layer’s blend mode to Multiply and lower the Opacity to 30%. Now paint some shadows below the text. You can change the Opacity value if you need to after adding the shadow.


Fresh Glossy Text Effect


Click the Create New Adjustment Layer icon (half-black, half-white circle) at the bottom of the Layers panel and choose Gradient. In the Gradient Fill dialog, click the Gradient thumbnail, double-click the color stop at the bottom left, enter #7c7c7c, and click OK to close the Color Picker. Now double-click the bottom-right stop, use the same color, and click OK twice. Back in the Gradient Fill dialog, change Style to Radial, Scale to 500%, check Reverse, and click OK.


Fresh Glossy Text Effect


Finally, change the adjustment layer’s blend mode to Linear Burn and lower the Opacity to 30%. This will complete the text effect by slightly adjusting the color.


Fresh Glossy Text Effect


Here’s the final result. The main effect is created using layer styles, but the images added the fresh, interesting drops and background. I hope you enjoyed the tutorial and found it helpful.


Fresh Glossy Text Effect


  • Digg
  • Del.icio.us
  • StumbleUpon
  • Reddit
  • RSS