Powered by Jasper Roberts Consulting - Widget
Top photoshop tips & tutorials: September 2014
Powered by Blogger.
RSS

Safe Healing and Cloning in Photoshop CC


Planet Photoshop


Safe Healing and Cloning in Photoshop CC


The Clone Stamp tool, on the other hand, copies one area of an image to another. Today, you’ll learn to use those tools safely to clean up a portrait.


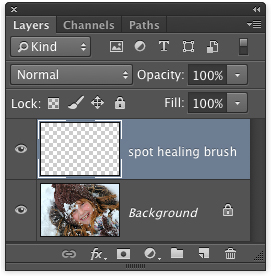
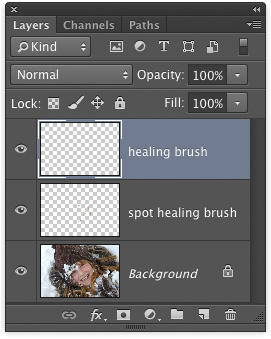
STEP ONE: The Spot Healing Brush tool (J) is great for repairing small- to medium-sized areas with surrounding pixels; those that Photoshop automatically picks. Open an image, create a new layer by pressing Shift-Command-N (PC: Shift-Ctrl-N), name it “spot healing brush,” and click OK. Position this layer above the layer you’re fixing.


Safe Healing and Cloning in Photoshop CC

CREDIT: ISTOCK, LINDAYOLANDA, IMAGE #3496810


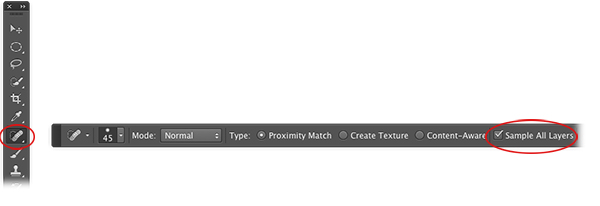
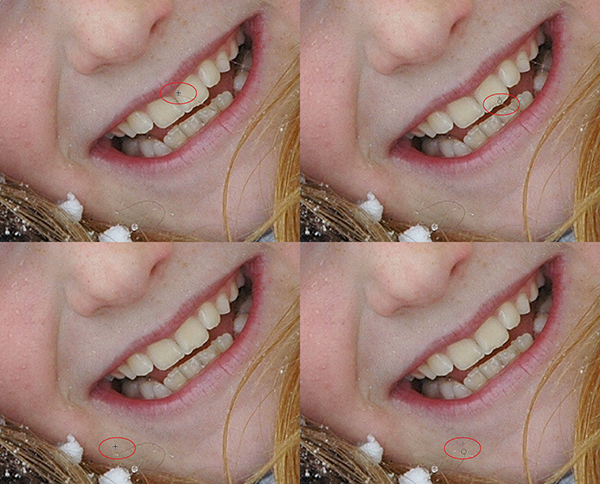
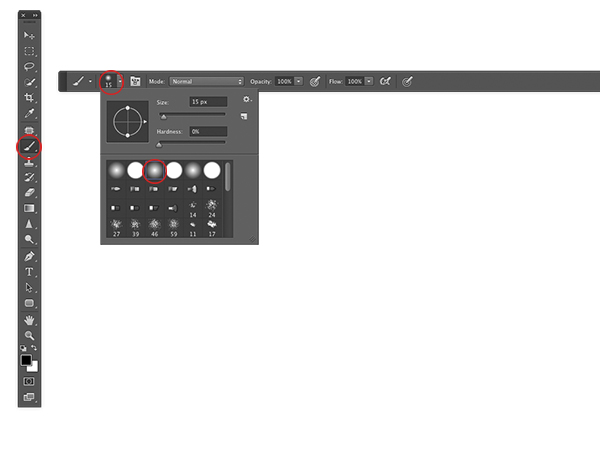
STEP TWO: Grab the Spot Healing Brush from the Toolbox. (Tip: Pressing Shift-J repeatedly cycles through all tools in that toolset.) In the Options Bar, set the Type to Proximity Match (uses pixels immediately outside the brush cursor) or Content-Aware (analyzes a larger area of nearby pixels); you’ll get slightly different results with each Type. Turn on the Sample All Layers checkbox to make Photoshop look through the active empty layer to pixels on layers below.


Safe Healing and Cloning in Photoshop CC

Step Two


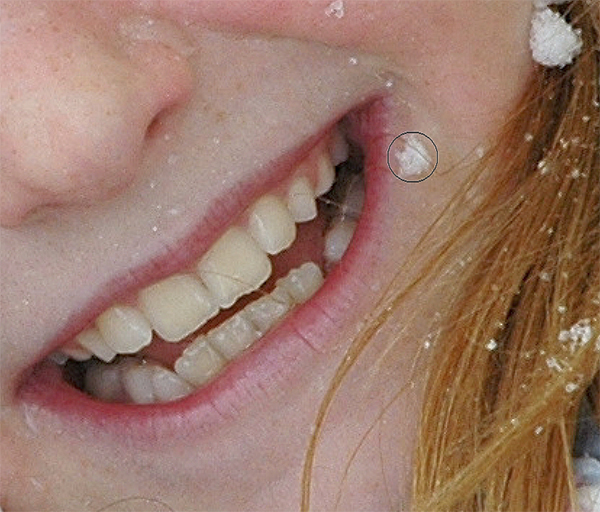
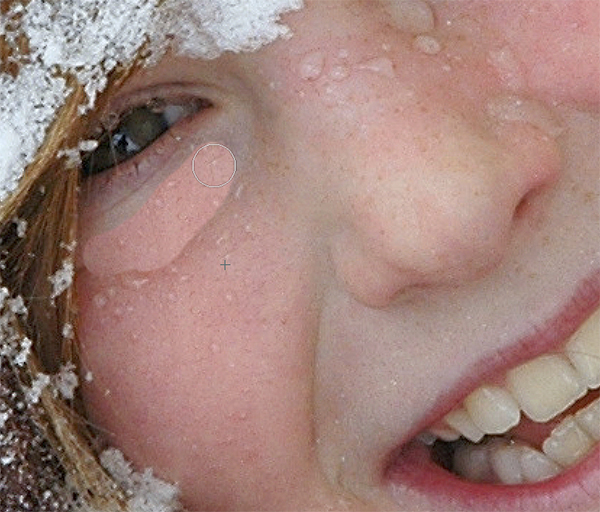
STEP THREE: Mouse over to the image and make your brush cursor slightly bigger than the area you’re fixing. Click or click-and-drag to remove those areas (a few snow and water droplets from the girl’s face in this example). If you don’t like the results, press Command-Z (PC: Ctrl-Z) to undo and either change brush size or switch modes (from Proximity Match to Content-Aware, or vice versa) and try again. Tip: Press the Left Bracket key ([) to decrease brush size and the Right Bracket key (]) to increase it. Zoom in and out of your image by pressing Command-+ or Command-– (PC: Ctrl-+ or Ctrl-–), respectively.


Safe Healing and Cloning in Photoshop CC


STEP FOUR: The Healing Brush tool is great for fixing small- to medium-sized areas with pixels from another area in your image that you pick by setting a sample point. Create a new layer as described in Step One, name it “healing brush,” and position it at the top of your layer stack.


Safe Healing and Cloning in Photoshop CC


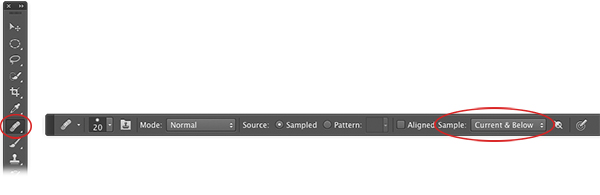
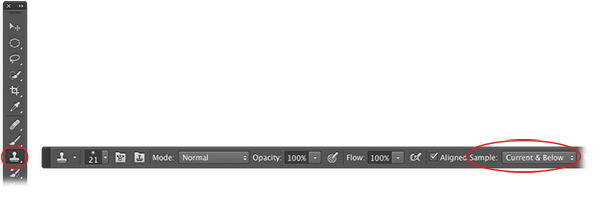
STEP FIVE: Activate the Healing Brush tool (nested below the Spot Healing Brush tool), and in the Options Bar, set the Sample menu to Current & Below.


Safe Healing and Cloning in Photoshop CC


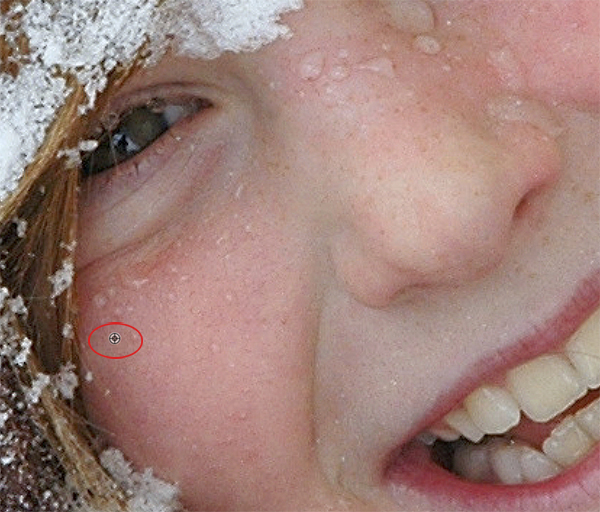
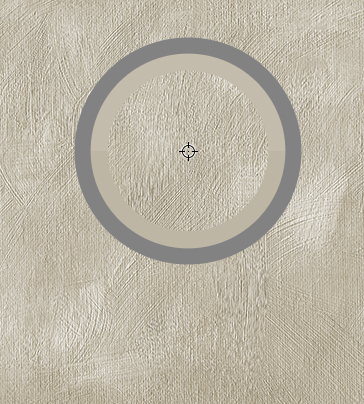
STEP SIX: To reduce the dark area beneath eyes, set a sample point by Option-clicking (PC: Alt-clicking) the spot you want Photoshop to use for the fix, such as the cheek area shown here. Try to use a nearby or adjacent area to match tone and texture.


Safe Healing and Cloning in Photoshop CC


STEP SEVEN: Mouse over to the problem area and adjust the brush size to be a little bigger than what you’re fixing. Next, click or, in this case, click-and-drag across the area. Tiny crosshairs mark the sample point as you drag, and a preview of the sampled area appears inside your cursor. Repeat this process on the other eye. If you’re fixing a small area, you’re probably okay with setting one sample point; for larger areas, you may need to set a new sample point every few brushstrokes. Tip: If you accidentally introduce a repeating pattern, either set another sample point and paint the error away, or switch to the Spot Healing Brush tool to fix it.


Safe Healing and Cloning in Photoshop CC


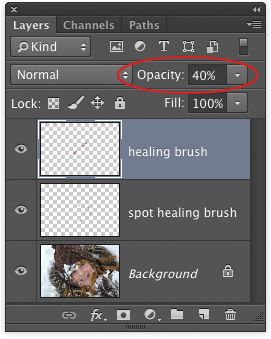
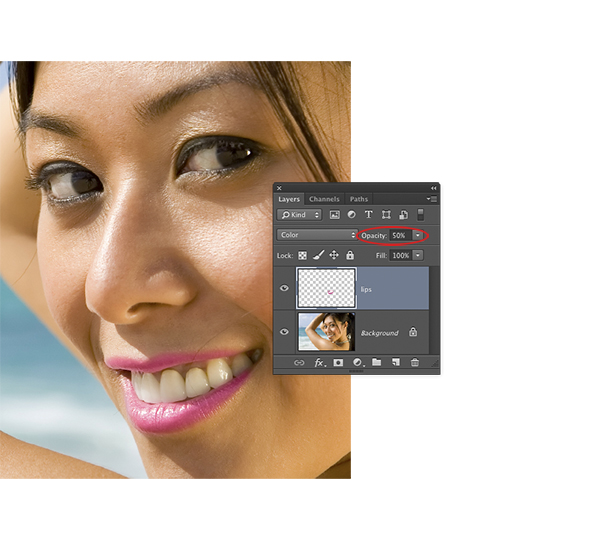
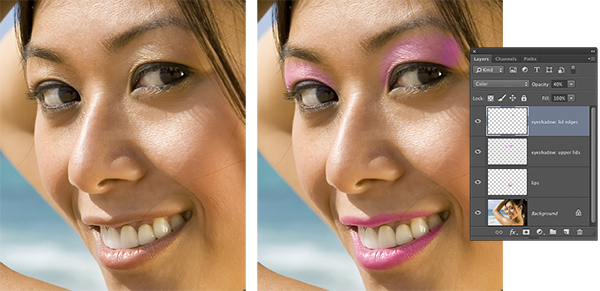
STEP EIGHT: Reduce the Opacity of the “healing brush” layer so your changes look realistic (40% was used here).


Safe Healing and Cloning in Photoshop CC


STEP NINE: The Clone Stamp tool (S) copies one area of your image to another, making it great for duplicating objects or removing stray hairs. Create a new layer as described in Step One, name it “clone stamp,” and position it at the top of your layer stack.


Safe Healing and Cloning in Photoshop CC


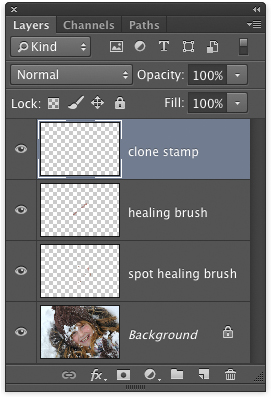
STEP TEN: Activate the Clone Stamp tool and, in the Options Bar, set the Sample menu to Current & Below.


Safe Healing and Cloning in Photoshop CC


STEP ELEVEN: Repeat Steps Six and Seven to remove strands of hair, such as on her teeth and chin in our example. (Tip: Use a small brush to remove or duplicate small items and a larger brush for bigger stuff.)


Safe Healing and Cloning in Photoshop CC


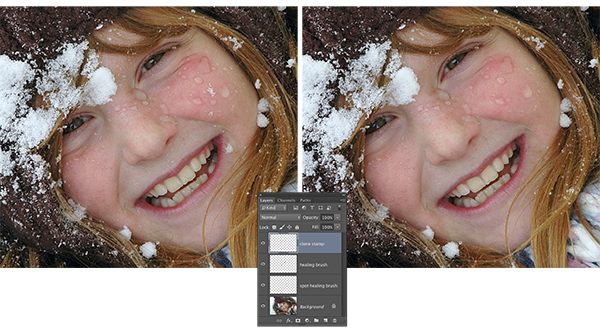
STEP TWELVE: Here’s the before and after version of the image, along with the final Layers panel.


Safe Healing and Cloning in Photoshop CC


STEP THIRTEEN: As mentioned earlier, you can use the Clone Stamp tool to duplicate items. In this image, we’re going to duplicate a snowball. Create a new layer, name it “clone stamp,” and set a sample point atop an existing area that you want to duplicate. Mouse over to another area of the image then click-and-drag to duplicate the object. If you introduce any repeating elements, set another sample point and click to fix it, or switch to the Spot Healing Brush or Healing Brush tools to fix it.


Safe Healing and Cloning in Photoshop CC

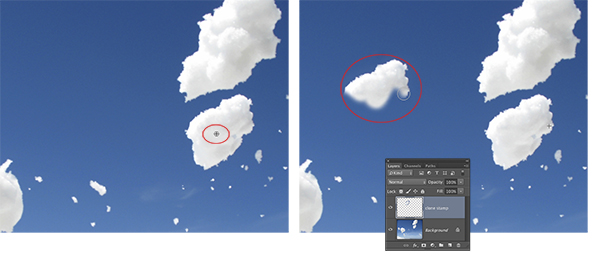
CREDIT: ISTOCK, ZENAPHOTO, IMAGE #6594728


STEP FOURTEEN: Be sure to choose File>Save As and pick Photoshop as the Format so you can edit each layer later. You can undo edits by activating that layer and using the Eraser tool (E) or by using a layer mask.


This article is courtesy of Photoshop User magazine, the official publication of KelbyOne, which provides quality online education for creative people. For more information, visit KelbyOne.com


  • Digg
  • Del.icio.us
  • StumbleUpon
  • Reddit
  • RSS

Applying Digital Makeup in Photoshop CC


Planet Photoshop


Applying Digital Makeup in Photoshop CC


By applying the makeup on separate layers, you can easily fine-tune the results.


STEP ONE: Open an image and add a new layer by pressing Shift-Command-N (PC: Shift-Ctrl-N). In the resulting New Layer dialog, enter “lips” in the Name field and then set the Mode drop-down menu to Color. This menu lets you change the way color on one layer blends with color on another layer. Using the Color mode keeps the brightness of the tones in your photo, but adds the hue and saturation values from the paint you’re about to apply, letting the details of the image show through (Overlay mode also works). Click OK, and make sure the new layer lives above the photo layer in your layer stack.


Applying Digital Makeup in Photoshop CC


STEP TWO: Press B to activate the Brush tool (circled) and using the Brush Preset Picker in the Options Bar (also circled), pick a soft-edged brush.


Applying Digital Makeup in Photoshop CC


STEP THREE: At the bottom of the Toolbox, click the Foreground color swatch. In the resulting Color Picker, use the vertical rainbow-colored bar to set the color range (magenta was used here), and then click inside the large square to tell Photoshop how dark or how light you want that color to be. Click OK to close the dialog.


Applying Digital Makeup in Photoshop CC


STEP FOUR: Mouse over to your image and paint across the lips. Use a larger brush for the inside of the lips and a smaller one for the edges. Tip: Press the Left Bracket key ([) to decrease brush size and the Right Bracket key (]) to increase it. Zoom in and out of your image by pressing Command -– (PC: Ctrl -–).

CAPTION: ISTOCKPHOTO, JACOMSTEPHENS, IMAGE #3391020


Applying Digital Makeup in Photoshop CC


STEP FIVE: If you make a mistake, you can fix it with the Eraser tool. Press-and-hold the E key to temporarily activate the Eraser tool and, in the Options Bar, set the Mode menu to Brush and then pick a soft-edge brush from Brush Preset Picker (just like you did in Step Two). Then, while still holding down the E key, mouse over to your document and paint away the mistake. When you’re finished, release the E key and Photoshop automatically reactivates the Brush tool (this feature is called spring-loaded tools).


Applying Digital Makeup in Photoshop CC


STEP SIX: With the lips layer active, choose Filter>Blur>Gaussian Blur. In the resulting dialog, experiment with the Radius to produce a very soft blur (4 pixels was used on this 1698×1131-pixel image). This helps the new lipstick blend in with surrounding pixels. If necessary, use the Eraser tool to fix areas of paint that have blurred beyond the lip edges.


Applying Digital Makeup in Photoshop CC


STEP SEVEN: Reduce the Opacity of the lips layer in the Layers panel to your liking (50% was used here).


Applying Digital Makeup in Photoshop CC


STEP EIGHT: Repeat Steps One–Seven to add eyeshadow, blush, etc. If adding multiple colors of eyeshadow—say, one for lower lids, one for upper lids, and one for the outer lid edges—be sure to add each color on a separate layer for maximum editing flexibility. Here, you can see how the brushstrokes were applied prior to lowering layer Opacity and blurring.


Applying Digital Makeup in Photoshop CC


STEP NINE: To change the color on any layer, click to activate the layer and then load it as a selection by Command-clicking (PC: Ctrl-clicking) the layer’s thumbnail (when you do, you’ll see marching ants surround that area in your document). Next, click the half-black, half-white circle at the bottom of the Layers panel and choose Hue/Saturation. Photoshop adds the new layer above the currently active one and opens the Properties panel. Click the icon at the bottom left of the Properties panel to clip the Hue/Saturation layer to just one layer beneath it. Finally, use the Hue, Saturation, and Lightness sliders to tweak the color of makeup on that layer.

CAPTION: Step Nine


Applying Digital Makeup in Photoshop CC


STEP TEN: Choose File>Save As and save the document as a PSD file. Saving the document in PSD format lets you go back and edit the individual layers later. Here’s the before and after version of the image, along with the final Layers panel.

[Insert image makeup_10.psd] CAPTION: Step Ten


Applying Digital Makeup in Photoshop CC


As you can see, adding digital makeup is easy. Happily, you can also use this exact same technique to add color to a black-and-white image.


This article is courtesy of Photoshop User magazine, the official publication of KelbyOne, which provides quality online education for creative people. For more information, visit KelbyOne.com


  • Digg
  • Del.icio.us
  • StumbleUpon
  • Reddit
  • RSS

Texture Blending Techniques


Planet Photoshop


Texture Blending Techniques


Combining textures with photos is a simple and creative way to impart a painterly quality. As I search for textures to blend with subjects, I can almost feel new synapses being formed in my brain. One idea leads to another, and sometimes I wind up with the most unlikely combinations. In every case, the process of experimentation expands my creative horizons. In this tutorial, we’ll blend a beautiful texture with a hot air balloon photo. During the process, we’ll learn how to hide parts of a texture without affecting density, how to drain color from a texture, and how to create a unique scorched border effect.


Note: The texture used in this tutorial is from French Kiss Collections. To receive a 15% discount on all French Kiss textures, click here and enter the coupon code MARKSJ15 at the end of the checkout process.


Step One: Locate an Image with Negative Space

Locate and open an image with a recognizable subject surrounded by negative space. If you’re unfamiliar with the term “negative space,” it refers to open and uncluttered areas around a subject. The advantage of negative space is that it allows the texture to be more prominent. Examples of recognizable subjects surrounded by negative space include a child in a wheat field with a washed-out sky, a teacup holding a flower sitting on a plain tablecloth, or the hot air balloons surrounded by blue sky that you see here.


Texture Blending Techniques


Step Two: Import an Interesting Texture

Locate and open an interesting texture. Press Command-A (PC: Ctrl-A), then Command-C (PC: Ctrl-C) to copy the texture to the clipboard. Return to the negative space file and press Command-V (PC: Ctrl-V) to paste the texture as a new layer.


Texture Blending Techniques

Texture Blending Techniques


Step Three: Mix the Texture with the Photo

In most cases, the Multiply and Overlay blend modes do the best job of blending a texture with a photo. Since this isn’t always the case, I prefer to explore all blend modes before making a decision. To quickly cycle through the list of blend modes, activate the Move tool (V), press-and-hold the Shift key, and tap the + key. In this example, Multiply mode is the most interesting, despite the brown cast, which we’ll eliminate in an upcoming step.


Texture Blending Techniques


Step Four: Intelligently Hide Parts of the Texture

In this step, we’ll hide (or reduce) the visibility of the texture where it overlaps the balloons without affecting density (brightness). Although a layer mask is capable of hiding parts of the texture, the downside of a mask is that it also affects density. Instead, we’ll use an alternative method. Option-click (PC: Alt-click) the layer visibility icon (eyeball) next to the texture layer (Layer 1). This turns off the visibility of all other layers. Choose the Brush tool (B). With only the texture layer visible, Option-click (PC: Alt-click) on a color in the general region of the subject (in this case, the balloons). This samples the color.


Texture Blending Techniques


Option-click (PC: Alt-click) the layer visibility icon next to the texture layer again to switch on visibility for all layers. Now is a good time to dial in the texture’s opacity. Hover over the word “Opacity” near the upper-right corner of the Layers panel and move the scrubby slider (hand with a double arrow) to the left to reduce the texture’s prominence.


Texture Blending Techniques


Option-click (PC: Alt-click) the Create a New Layer icon at the bottom of the Layers panel. In the New Layer dialog, check the Use Previous Layer to Create Clipping Mask box. This clips the texture-reducing layer we’re creating to the texture layer. Click OK. With the Brush tool still active, use a soft-edged brush at 100% Opacity and Flow to paint over the balloons in both the sky and reflection. Painting with the sampled color eliminates the texture, but maintains the density. Cool! If you’d like to restore a hint of texture to the balloons, reduce the layer’s opacity.


Texture Blending Techniques

Texture Blending Techniques


Step Five: Eliminate Color from the Texture

Since the brown color of the texture is corrupting the color of the picture, let’s drain the texture’s color. Choose Layer>New Adjustment Layer>Black & White. To drain color from only the texture, check the Use Previous Layer to Create Clipping Mask box and click OK.


Texture Blending Techniques


Step Six: Add a Scorched Border

Texture-blended photos often look nice with a creative border, so let’s use the built-in layer styles to create a scorched one. Ensure that the topmost layer is active. While pressing Option (PC: Alt), choose Layer>Merge Visible. This creates a merged composite layer at the top of the layer stack. Now choose Layer>Layer Style>Inner Glow. Set the Blend Mode to Color Burn, click the yellow color swatch, and set the color to black. Click OK to close the Color Picker. Drag the Size slider to the right until you’re pleased with the width of the border. Tweak the Opacity until the desired effect is achieved, and click OK to close the Layer Style dialog.


Texture Blending Techniques


If desired, experiment with adding additional textures. Here’s a magnified version of our starting photo.


Texture Blending Techniques


And here’s the completed effect.


Texture Blending Techniques


If working with textures excites you, you may get a kick out of the following free tutorials:


Photoshop Workbench 351: French Kiss Painterly Texture Montage


Photoshop Workbench 315: Creativity with Textures


Photoshop Workbench 423: Texture Blending with Adobe Paper Texture Pro


Mark S. Johnson Photography

msjphotography.com


  • Digg
  • Del.icio.us
  • StumbleUpon
  • Reddit
  • RSS

Acer K272HUL Display


Planet Photoshop


Acer K272HUL Display


Budget Widescreen Monitor


The Acer 27″ widescreen K272HUL display offers lots of room with an impressive, sharp, native resolution of 2560×1440 in a 16:9 aspect ratio. It has abundant connectivity, built-in speakers, and a great price for people on a budget; however, a few conventional ergonomic features are missing.


A 3/4″ shiny black bezel frames the 27″ display. It has a five-button control panel at the bottom right, which is difficult to see because the black buttons are indistinguishable from the rest of the frame. The screen has a sturdy base; however, it only tilts back and forth. There’s no swivel, no height adjustment, or ability to change orientation from landscape to portrait.


The control panel has some good basic features, such as sliders for adjusting brightness, contrast, and individual colors by saturation and hue; but none for adjusting color temperature. Instead, factory presets allow standard viewing of graphics and movies. Using DataColor’s Spyder4 to calibrate the display, I got a decent response, but could only achieve 80% of the Adobe RGB color space. (This might be a deal breaker for demanding photographers and graphic artists who need a wider color space.)


Still, its large, LED backlit, non-glare screen has an impressive viewing angle of approximately 170°, making it ideal for viewing multiple documents or movies with friends. Its modest 60-Hz refresh rate should be fast enough for economic-minded gamers, as well. The display has most of the ports you’ll need: two HDMI ports, two DisplayPorts, a DVI port, and audio jack.


The Acer K272HUL might not be ideal for photo editing but it’s a terrific display for all-around use.


Company: Acer Inc.

Price: $399.99

Web: www.acer.com

Rating: 3.5

Hot: Inexpensive; wide screen

Not: Tilt-only screen; narrow color space; no USB ports


  • Digg
  • Del.icio.us
  • StumbleUpon
  • Reddit
  • RSS

Lenovo ThinkPad W540


Planet Photoshop


Lenovo ThinkPad W540


Thin, Light, Mobile Workstation


More and more, laptops are replacing desktops in the workplace and at home. Creative professionals are no exception, as we want to take our power on the go without having to work from a network or external drive. The ThinkPad W540 from Lenovo is bringing us to that point.


In a laptop, I need two things: horsepower and resolution. Horsepower’s no problem, as the ThinkPad W540 that I tested came with an Intel Core i7-4800MQ (6 MB, up to 3.7 GHz) and 8GB RAM (upgradeable to 16 GB), and it ran effortlessly in all of the Adobe Creative Cloud programs. As far as screen resolution, I haven’t found many laptops that can compete with the MacBook Pro; but I found it here with the ThinkPad’s 15.5″, 3K (2880×1620), impressive display with integrated color calibrator. Couple that with the NVIDIA Quadro K2100M (2-GB GDDR5 VRAM), a 256-GB SSD drive, and we’re cooking with gas! I imported an entire catalog from a shoot into Lightroom in the same time it took on my powerful desktop, and editing photos was a pleasure, as the display provided all the pixels I needed. It also rendered a video project quickly, and ran After Effects without bringing the laptop to its knees.


It also has a few bells and whistles: a modern Thunderbolt port (for data, displays, and multiple devices in a chain); two USB 2 and two USB 3 ports; and a card reader. An HDMI port would be nice, but you can use an adapter with the Thunderbolt connection—cumbersome, but not a deal breaker.


At 5.5 lbs, the Lenovo ThinkPad W540 is easy to carry, and for the money, it’s definitely worth consideration as a viable option for a desktop replacement, or for a user who needs portable power.


Company: Lenovo

Price: $2,260.05 (as tested)

Web: http://lenovo.com

Rating: 4.5

Hot: Display; NVIDIA card; Thunderbolt; USB ports

Not: Design is a bit dated; no HDMI port


  • Digg
  • Del.icio.us
  • StumbleUpon
  • Reddit
  • RSS

PortraitPro 12 Studio


Planet Photoshop


PortraitPro 12 Studio


Fantastic Tool for Quick, Quality Retouching


Professional retouching in Photoshop requires years of experience and hours of meticulous work, but with life moving a thousand miles per hour, it’s rare we have the luxury to devote that time to every image. Coming to our aid is PortraitPro 12 Studio, which improves upon an already rich collection of features and adds a couple of great new ones.


PortraitPro instantly detects faces in each image opened. Results are quick and usually very good, but any adjustments are an easy process. The Standard results are good, so you could potentially have a retouched image ready to go in just one minute. My only issue is that it automatically adds Face Sculpt—Standard settings should not include sculpting. Any scrupulous retoucher begins with the face as is, only correcting for perceived flaws when necessary. The good news is there’s a comprehensive list of presets, and versions of each without sculpt, plus one-click removal in the presets. The Natural presets are great starting points, but the Glamorous presets are a bit heavy-handed; however, everything is easily fine-tuned with the sliders.


The Face Sculpt Controls are really pretty cool and they have their place in some portrait retouches. It’s easy to widen eyes or align uneven eyes here; I was even able to tone down an overly gummy smile with the mouth controls. Some clients are really insecure about the size of their forehead or how chubby their face appears in photos. These tools make quick work of adjusting a heavy face, long nose, or other feature that can suddenly stand out in a photo. Restraint and small movements will give pleasing results; pushing things too far can look outlandish.


The Skin Smoothing Controls give you complete control, even separate sliders for the left and right under eye areas. With 14 different Skin Texture Types, smoothed areas still look like skin and are not just blurred or noisy, as with other retouching software. For blemishes the Skin Smoothing Controls can’t fix, there’s the Touch Up Brush (like the Healing Brush in Photoshop) for targeted zapping of spots. These sliders provide results in one or two minutes that could take an hour or more in Photoshop, and are worlds better than any method I know of for fixing skin in Lightroom.


Other sections include Eye Controls and Mouth & Nose Controls, which give you sliders for the left and right eye, and the top and bottom lip. You can brighten, sharpen, whiten, and adjust eye and lip color here. The Skin Coloring Controls seem improved from the previous version, allowing you to quickly adjust the tint, temperature, and exposure, even add blush or a tan. Picture Controls allow for overall exposure adjustments and the like.


New to this version is a Skin Lighting Controls section, as well as lighting presets including Rembrandt and Light from Above. Here, you can move the light source, adjust shadows, even add Left Kick or Right Kick. Going too crazy in this section can create blurriness outside the face area, but it’s nothing that can’t be resolved by backing off on the adjustments. Also new to version 12 is Facebook connectivity so you can share before and after images with clients on Facebook with just a couple of clicks. Handy-dandy.


The only section that doesn’t impress me is the Hair Controls. Low settings here can improve the shine or vibrancy of the hair, but adding more than a touch of smoothness is reminiscent of Oil Paint in Photoshop and is too unnatural. Steer clear of Hair Recolor, save perhaps applying a tiny amount to improve the hair’s hue. It is exciting to see the selection of real hair colors in this section, but they look artificial when applied. Changing hair color is still difficult to do believably, even with Photoshop, so I can’t wait until this section is on par with the others because it has the potential to be really nifty.


PortraitPro 12 Studio is powerful retouching software at a very reasonable price. It can be used alone or as a plug-in for Photoshop, Lightroom, Aperture, or Photoshop Elements. Plus, it’s so much fun to use that it makes me wish I had a folder of portraits needing retouching right now. It takes what can be a tedious, repetitive task, and gives good results quickly, so you can move on to other things. I challenge you to download the free trial and give PortraitPro 12 a test run. I bet you’ll go back for the full version!


Company: Anthropics Technology Ltd.

Price: $159.90

Web: www.portraitprofessional.com

Rating: 4.5

Hot: Myriad features make retouching fast and enjoyable

Not: Hair Controls not natural looking yet


  • Digg
  • Del.icio.us
  • StumbleUpon
  • Reddit
  • RSS

HP DreamColor Z27x Professional Display


Planet Photoshop


HP DreamColor Z27x Professional Display


Delivers Clarity, Contrast, and Saturation


There are many marketing terms that are used to describe display monitors, such as “bold colors” or “vibrant images.” For the design professional, however, a natural, more neutral, and completely accurate representation of your work is what tends to produce the best results. The DreamColor Z27x is just that: a professional display that delivers beautiful images with all of the clarity, contrast, and saturation for a well-balanced view of your work.


As always, the first step for me was to calibrate the display, and it dialed in easily. In fact, after nearly a dozen test images, it became clear that everything looked better on this display. Given its price, there are definitely less expensive displays; but if your work is color-specific and will be used for more critical applications, the HP DreamColor Z27x is worth every penny. Its only real competition would be either the NEC PA271W-BK, which doesn’t have the Z27x’s 100% Adobe RGB color coverage (although its MSRP is a few hundred dollars less) or the Apple 27″ Thunderbolt Display (at around $1,000) that has more screen glare, saturation, and contrast.


The Z27x will run in either landscape or portrait mode to produce sharp, clean edges and hues. Truly, any output that you create looks exactly as you intended. Its 2560×1440 resolution and 16:9 aspect ratio give you the whole image with outstanding accuracy (and 4K input support, as well). The quality is so clear that you may find yourself opening random images just to see how they appear on this display. So, if your work includes HD video, animation, graphics, or high-resolution photography, the HP DreamColor Z27x is a dream come true.


Company: Hewlett-Packard Development Company, L.P.

Price: $1,499

Web: www.hp.com

Rating: 5

Hot: Color; clarity; accuracy; coverage

Not:


  • Digg
  • Del.icio.us
  • StumbleUpon
  • Reddit
  • RSS

Blinkbid 7


Planet Photoshop


Blinkbid 7


Easy Bids and Invoices for Creative Professionals


Photographer Lou Lesko designed Blinkbid to help other creative professionals simplify and streamline the often dizzying process of creating bids and invoicing for jobs. Now at version 7, Blinkbid has added a slew of new features, such as discounts on estimates and an easier-to-use Production Module.


Blinkbid is so easy to use that you can create your first bid in minutes, yet it’s powerful and flexible enough to customize for your specific business needs. New Blinkbid users will appreciate the sample Groovy Agency bid that’s included to familiarize them with bid components and get them quickly up to speed creating their own bids. Who doesn’t love the Groovy Agency?


Knowing how to create a bid is one thing, but knowing what to charge is another. Blinkbid’s built-in Bid Consultant pulls from a database containing two years of average national fees charged for different photography jobs. This rate information is automatically updated every month, assuring consistently accurate rate information. The Bid Consultant functions like a wizard, asking questions such as usage, client category, license length, number of final images, etc. Once the Bid Consultant has all the information it needs, clicking the Calculate button quickly returns a base fee range for that type of job. Brilliant!


Personalities is another extremely useful feature for users who manage multiple brands, say weddings on weekends and commercial work during the week. You can create a separate Personality (category) for each line of business and separately bid, invoice, and track financials for each.


With a ton of robust features, clean interface, and supersimple bid creation, Blinkbid helps you get back to business. A free 14-day trial is available for Mac and Windows.


Company: Blinkbid, LLC

Price: $229 (Upgrade: $89)

Web: www.blinkbid.com

Rating: 5

Hot: Straightforward; easy bidding and invoicing; helpful pricing guide

Not:


  • Digg
  • Del.icio.us
  • StumbleUpon
  • Reddit
  • RSS

X-Men Type Effect


Planet Photoshop


X-Men Type Effect


I gave our editor, Chris Main, a few options for this issue’s “Down & Dirty Tricks” column and, of course, he went with the X-Men type effect. Now, I really shouldn’t have been surprised considering his office is jammed-packed with just about every Marvel action figure known to man, along with Star Wars figures, a Stormtrooper piggy bank, a Doctor Who Tardis cut out, etc. But none of that has anything to do with this tutorial other than Chris’s office is a mini Marvel toy store. Anyway, this is a great type effect that can enhance any design, even if you don’t wear a cape or tights, which I’m pretty sure Chris has stuffed into a desk drawer.


Step One: Open the X-MAN Paths.psd document and create a new layer (Layer 1) by clicking on the Create a New Layer icon at the bottom of the Layers panel. In the Paths panel (Window>Paths), Command-click (PC: Ctrl-click) on the Path 1 thumbnail to load it as a selection.


X-Men Type Effect

X-Men Type Effect


[KelbyOne members may load the file used in this tutorial at clicking here. All files are for personal use only.]


Step Two: Press D to make the Background color white, then click on the Foreground color swatch at the bottom of the Toolbox, choose a light-blue color (R:113, G:150, B:206), and click OK. Choose the Gradient tool (G) from the Toolbox. In the Options Bar, click on the gradient preview, choose the Foreground to Background preset, and click OK. Now, click-and-drag a gradient from the top toward the bottom of the selection. Press Command-D (PC: Ctrl-D) to deselect.


X-Men Type Effect

X-Men Type Effect


Step Three: Click the Add a Layer Style icon (fx) at the bottom of the Layers panel, and choose Bevel & Emboss. Enter 1000% for Depth and 7 px for Size. Uncheck Use Global Light, enter 120° for Angle and 40° for Altitude. Click on the down-facing arrow next to the Gloss Contour thumbnail and choose Cone – Inverted, then lower the Highlight Mode Opacity to 30%. Don’t click OK yet.


X-Men Type Effect

X-Men Type Effect


Step Four: Choose Satin from the Styles list on the left side of the Layer Style dialog. Choose Darken as the Blend Mode, lower the Opacity to 50%, enter 72° for Angle, 13 px for Distance, 9 px for Size, and check the Invert box. Now, choose Gradient Overlay from the Styles list. Choose Multiply as the Blend Mode, enter 50% for Opacity, and choose Reflected for Style. Click OK to apply the layer styles.


X-Men Type Effect

X-Men Type Effect


Step Five: Create a new layer (Layer 2) and load Path 1 as a selection. Change the Foreground color to a light gray/green (R:149, G:157, B:134). Press X to switch the Foreground and Background colors. Choose the Gradient tool, then click the Reflected Gradient icon in the Options Bar (fourth icon from left). Click-and-drag a gradient from the center toward the right side of the selection (see example). Change the layer blend mode to Darker Color. Deselect.


X-Men Type Effect

X-Men Type Effect

X-Men Type Effect

X-Men Type Effect

X-Men Type Effect


Step Six: Create a new layer (Layer 3) and load Path 2 as a selection. With the Gradient tool selected, click the Linear Gradient icon in the Options Bar (first icon). Click-and-drag a gradient from the top toward the bottom of the selection. Deselect.


X-Men Type Effect


Step Seven: Click on the Add a Layer Style icon and choose Inner Glow. Choose Multiply as the Blend Mode and enter 50% for Opacity. Click on the yellow color swatch, choose a gray color (R:128, G:128, B:128), and click OK. Enter 3 px for Size. Now, choose Outer Glow from the Styles list. Choose Multiply as the Blend Mode and enter 50% for Opacity. Click on the white color swatch, choose a gray color (R:128, G:128, B:128), and click OK. Enter 6 px for Size and click OK to apply the layer styles.


X-Men Type Effect

X-Men Type Effect

X-Men Type Effect


Step Eight: Create a new layer (Layer 4) and load Path 2 as a selection. Press Option-Delete (PC: Alt-Backspace) to fill the selection with white. Deselect.


X-Men Type Effect

X-Men Type Effect


Step Nine: At the top of the Layers panel, lower Layer 4’s Fill to 0%. Click the Add a Layer Style icon and choose Pattern Overlay. Choose Multiply as the Blend Mode and lower the Opacity to 50%. Click the down-facing arrow next to the Pattern thumbnail. Using the default patterns, choose Laid-Horizontal, lower the Scale to 25%, and click OK.


X-Men Type Effect

X-Men Type Effect


Step Ten: Click on the Add Layer Mask icon (circle in a square) at the bottom of the Layers panel. Press X until the Foreground color is black. Choose the Gradient tool, click on the gradient preview in the Options Bar, choose Foreground to Transparent, and click OK.


X-Men Type Effect

X-Men Type Effect

X-Men Type Effect

X-Men Type Effect


Step Eleven: Click-and-drag a gradient from the right edge of the N toward the A, then click-and-drag a gradient from the left side of the X toward the M to mask out the outside edges of the pattern (see example).


X-Men Type Effect

X-Men Type Effect


Step Twelve: Click the empty square to the left of the type layer to make it visible (if you’re not using the support file we provided, you’ll have to create a type layer). Create a new layer (Layer 5) and drag it below the type layer. Command-click (PC: Ctrl-click) on the type layer thumbnail to load it as a selection. Press D to set the Foreground color to black. Now, press Option-Delete (PC: Alt-Backspace) to fill the selection with black. Note: You won’t be able to see the black fill on Layer 5 because it’s hidden behind the original type layer.


X-Men Type Effect

X-Men Type Effect


Step Thirteen: Press Command-T (PC: Ctrl-T) to bring up the Free Transform bounding box. Using the Up Arrow key, move the selection up until you see the top of the black fill selection overlapping the bottom of the X-MAN type. Now, click on the bottom-center adjustment point and drag it up to compress the type. Press Enter to apply the transformation.


X-Men Type Effect

X-Men Type Effect


Step Fourteen: Using the selection tool of your choice (we used the Lasso tool [L]), make a selection around the A and S in the word “PAST” on Layer 5. Use the Free Transform function to rotate and reposition the selection over the diagonal portion of the N, and press Enter to apply the transformation. Deselect. Repeat this step using the other characters until all the letters appear to be reflecting under the X-MAN letters (see example).


X-Men Type Effect


Step Fifteen: Go to Filter>Blur>Motion Blur. Enter 0° for Angle, 16 Pixels for Distance, and click OK. Change the blend mode to Multiply. Duplicate Layer 5 by dragging it onto the Create a New Layer icon at the bottom of the Layers panel to intensify the reflections and complete the effect.


X-Men Type Effect


Bonus Step: If you want to add a bit more highlight pop, simply add another layer (Layer 6) and change the blend mode to Overlay. Use a small, soft-edged brush (B) with the Foreground color set to white, and paint in a few highlight spots on some of the bottom edges of the text.


X-Men Type Effect


  • Digg
  • Del.icio.us
  • StumbleUpon
  • Reddit
  • RSS